SERP as we have learned is an acronym for "Search Engine Rank Position" or "Search Engine Results Page". This is what you have to do with your web page before submitting it to the search engine. Set everything up like we have discussed, before asking to be indexed by the search engines. Go over and over your webpage and make sure that you addressed all the elements that we have talked about. Make good use of the Yoast WordPress Plugin to determine your keyword density and its use. Everything should be as perfect as you can make it before the big day of asking to be indexed. Publishing and indexing are 2 different things, do not get them confused. Just because you publish a webpage does not mean that it is going to be indexed. We will be studying this more in depth in lesson 7 however we will now learn the steps that it takes to have a webpage indexed in the Google Search Engine.
SERP AND INDEXING
-
Type into Google, "Google Webmaster Tools"
-
Click on the link
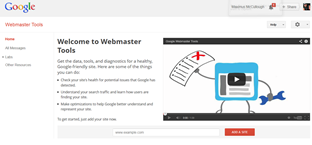
- You will see a screen like this.
-
Enter your web address URL and click, "Add A Site"
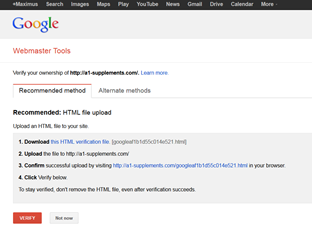
- Next you will see a screen like this
-
If you are familiar with FTP and uploading and downloading you can download the html file and upload it to the root directory of your website.
-
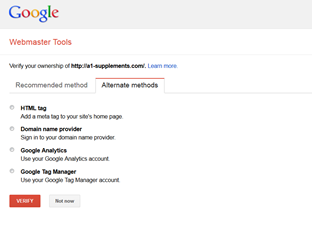
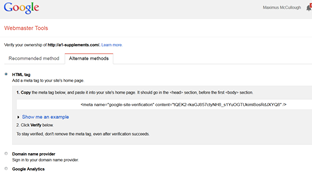
For those on a WordPress CMS with the Yoast Plugin the process is much simpler. Click on "Alternate Methods" and you will see a screen like this.
-
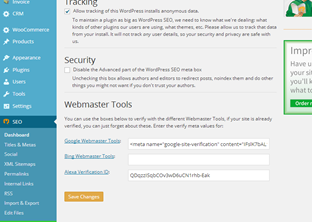
Click on HTML tag, you will see a screen like this appear. Copy that code to your clip board and then sign in to your WordPress dashboard.
-
Scroll down to the Yoast WordPress plug in and click on dashboard. You will see a place to put your code.
-
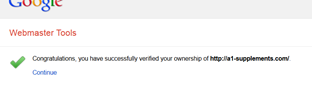
- Go back to your Google Webmaster Tools and click on verify. If you are successful you will see a screen like this.
-
Now click on "continue" and you will be logged in to your Google Webmaster Tools dashboard.
-
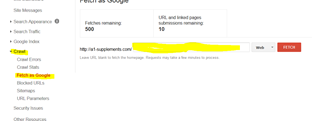
Click on the "Crawl" section on the left. Then "fetch as Google and enter in the last part of your url after the .com and click fetch. This is how you tell Google you are ready.
-
Now Google will fetch your URL and spider it and index it according to their algorithm. Usually this process only takes a few minutes but can take days before you are indexed with a new site.
BACKING UP YOUR WEBSITE
One of the most important things that you can do is back up your website. There are 2 different kinds of backups for WordPress. We will discuss the easy way then the more thorough way through your cPanel.
The Easy Way in WordPress
Go to your dashboard and scroll down to where it says "Tools". Click on export and export everything. Save the XML file somewhere on your desktop in a folder labeled website backup! You're done!
NOTE: This way does not back up your media or graphics, only text.
The Thorough Way
Go to your cPanel and log in. Scroll down to where it says "Backup Wizard"
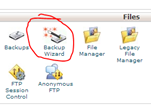
and click on it.
Next you will see the following screen. Click on backup again.
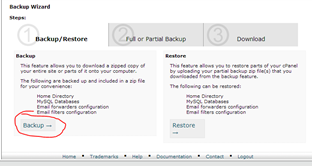
Then click on "Full Backup"
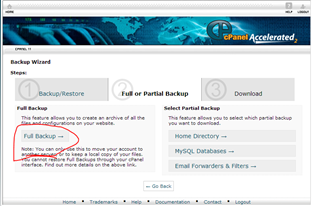
Next make sure "Home Directory" is selected and enter your email address so you can get a link of the backup in your email. Then click "Generate Backup"
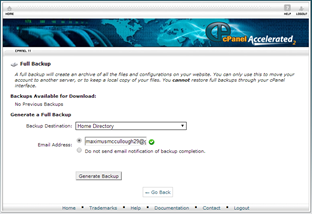
It will contain your graphics, database, media and all your files in a zip folder.
ANCHOR LINKS
Anchor links on a webpage help the visitor get to the part of the content that interests them the most. It also helps other websites link to relevant content on your web page. Anchor links act as a "Table of Contents" for your web page and it is a great thing to use for SEO. They act like quick links on a webpage and it will zoom the visitor to a certain location on your website. You can install the "Better Anchor Links" plug in on the WordPress CMS and it will dynamically make anchor links based upon your heading tags. If you cannot take advantage of a WordPress CMS plug in below are instructions on how to manually make an anchor link.
At the top of the page where you have your contents wrap them in this link structure.
<a href"
#your-subheading"> Your Subheadings</a>
Now put the anchor in where you want it to jump to using the following code structure. You do not have to put the name inside the a tag on this one just put the code beside it.
<a name="your-subheadings"></a>Your Subheading
GOOGLE ADSENSE
The Google AdSense program is for honest people only. There are mechanisms installed into the Google AdSense program that can detect if the same person is clicking on the ads over and over again. So that being said, if you want to take advantage of extra income that selling advertising on your website can bring, enroll in the Google AdSense program. The requirements for signing up are as follows.
-
You must have a website with content on it.
-
-
After that you will have to wait a week or two before Google comes and visits your site to see if it meets the criteria for AdSense.
-
During the signup process you have to promise a few things.
-
You will not click on the ads on your site.
-
You cannot have pop ups on your site
-
You cannot tell people to click the ads
-
You cannot try to trick people into clicking on your ads
Why use Google AdSense?
They are the highest paying advertisement agency for websites. They serve relevant content to your visitors so that when a spider comes to your site it will see that you have ads that are relevant to your content and to what the searcher is searching for. So by having Google AdSense on your website you not only get income from it you benefit from serving your visitors with relevant ads that are linked to relevant pages on the internet. This can greatly increase your SERP as well.


 and click on it.
Next you will see the following screen. Click on backup again.
 Then click on "Full Backup"
 Next make sure "Home Directory" is selected and enter your email address so you can get a link of the backup in your email. Then click "Generate Backup"

