
Yes, DKIM, SPF & DMARC is the key to #email delivery so that your emails do not go to the spam folders in Gmail, Ymail, and more! Your nightmare is OVER! This is your solution 100% guaranteed! Unlike other tutorials online, I am going to show you how to do this right, so it works and I prove it to you in the video tutorial.
DKIM SPF DMARC
What is DKIM SPF DMARC ? Well, if you are here, you probably already know what they are because there are tons of explanations of what they are all over Google. The only thing they don't tell you is how to do it correctly! Basically, these methods verify you are who you say you are. I've linked every ones of those methods so you can read them at other sites. If you just want to know how to do it quick and do it right, read on!
- #DKIM = DomainKeys Identified Mail
- #SPF = Sender Policy Framework
- #DMARC = Domain-based Message Authentication, Reporting, and Conformance
Email Delivery to Gmail Ymail and Others
So the big problem is email delivery to #Gmail, #Ymail and other email providers. They could reject them altogether or have them go into the receiver's spam folder. This is no good for you or the person you're trying to contact. If your IP address is blacklisted by Outlook then click this link to get it resolved.
Preliminary Steps For This Tutorial
This tutorial already assumes you have the following.- You have a website setup with hosting. If not, get a domain name here.
- You have a SSL installed {Free with a free CloudFlare account amp; A1WebsitePro}
- You have access to DNS to enter your records. Tutorial Here!
- You pointed your domain to CloudFlare. Tutorial Here!
DKIM SPF DMARC Testing Tools
Here is a list of sites that I use to test the emails and records. These will save you loads of time and aggravation!- https://www.experte.com/spam-checker- Another Way To Test Emails
- https://mxtoolbox.com/dkim.aspxTo test DKIM records.
- https://mxtoolbox.com/spf.aspx To test SPF records.
- https://mxtoolbox.com/dmarc.aspx To test DMARC records.
- https://www.warmy.io/free-tools/email-deliverability-test Test multiple email deliveries.
Enter SPF Record
It is so simple to enter your SPF record.- Go to your DNS. {CloudFlare or A1WebsitePro if your not using CloudFlare}
- Add a TXT record.
- Put the @ sign in the name
- Put this in the value part. Change to your IP address!!!
-
v=spf1 a mx ip4:111.111.111.111 ~all
-
- Save it and YOUR DONE!
Enter DMARC Record
OK now let's enter your DMARC record. Same deal, very simple.- Go to your DNS. {CloudFlare or A1WebsitePro if your not using CloudFlare}
- Add a TXT record.
- In the name section put _dmarc
- In the value section put this.
-
v=DMARC1;p=reject;sp=reject;pct=100;rua=mailto:email@example.com;ruf=mailto:email@example.com;
-
- Save it and YOUR DONE! WOW, simple huh?
Now one last part, the DKIM record. It is not as simple as the others so we will discuss this on the next page.
Enter DKIM Record
Entering the DKIM record is a little tricky, but we are going to give you the knowledge to be successful at it. Once you are successful, please share this post so that others can have the same chance. There are 2 parts to a DKIM record. One is the private key you put on your server and the other part is the public key that you put on your DNS like the steps above. Since there are several kinds of panels, I will tell you how to generate one on each kind.
ISP Config
To generate one one ISPConfig you want to go to "Email" then either add a new domain or click on the website that you need a DKIM record for. Click on the button that says DomainKeys Identified Mail (DKIM). Tic the little box that says enable DKIM. Scroll down and click "Generate DKIM Private-key. Copy the one in the bottom box to a note pad. Go to the last page for the other details.
cPanel DKIM Generate
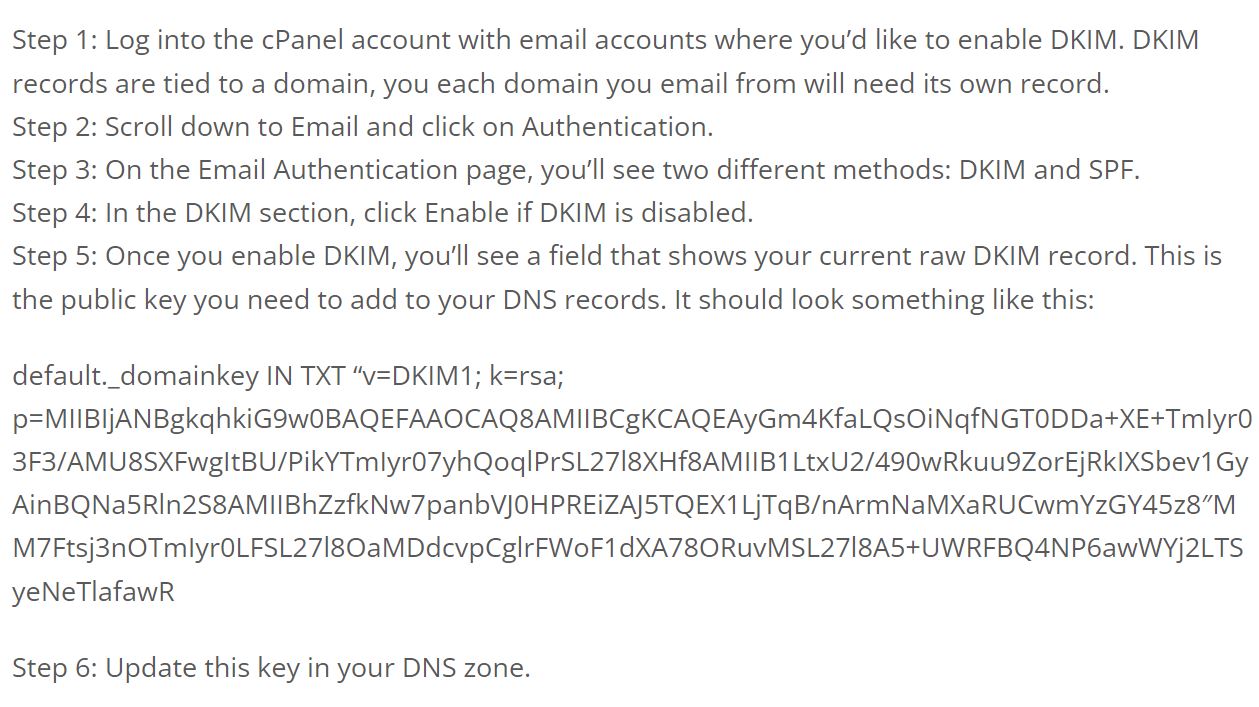 Now lets talk about editing the syntax of the DKIM before you enter it into you DNS on the next page.
Editing your DKIM Public Key
After you paste the public key into your notepad or text editor, remove all the spaces and line breaks. Spaces and line breaks will cause your DKIM to fail. If you press "Control f" on your keyboard, look for all the double quotes and take them totally out! When done there should be no spaces, quotes or line breaks. Also make sure you add the following if they are not in there.
- v=DKIM1;
- t=s;
- k=rsa;
- p=YOUR KEY GOES HERE FOLLOWED BY A SIMICOLEN;
It should look something like this.
v=DKIM1;t=s;k=rsa;p=MIIBIjANBgkqhkiG9w0BAQEFAAOCAQ8AMIIBCgKCAQEAwKRHxAYoNmeusU5RTFLerGDju866CGCT02aOOOEi0iD8WWgmH33qA1VUvDJfF6TSgas0UjK5sRRjtBi5Dyaq5jRp0PKCLPO7nPSofbsEYFe7Ei8XSDmD2e0waC6muQUpqg/mrweOMO9tY9OXM/H/Y/ad 3fjwcJbGFif22HOYi7zr0gxJA5PiMRTf6qcJWKUIxrIH5YhyKnzuXSBc6s2/1HPTDCY7cINTbBImtw/dHDIA0/vVPeYWIM2dc Rq0YUNPRioNoa29N9PnOZzmQ/hnVuvzfs fuxMys5LnRTbt kco Eew67CWa9EaZcmNmwjCMe8bwyTqYPcy5K9U/ NQIDAQAB;