This is an Ajax in WordPress tutorial. Let it serve as an ultimate beginner's guide for you. I have already made several posts on Ajax and how to use it. However, this is my first post for using Ajax in WordPress. I think you will enjoy this lesson with all the codes and video instruction.
Ajax In WordPress
In this lesson we are covering Ajax in WordPress and it differs from the other lessons that I show in my Ajax category. This is still Ajax, but I am going to break it down for you here. In this tutorial we are going to make a WordPress plugin that will show a subscribe button to your YouTube channel on your website. If you need to create the YouTube subscribe button see this post. Add YouTube Subscribe Button On Your Website EASY TUTORIAL (a1websitepro.com). We will take the code generated there and using it in this Ajax in WordPress tutorial.Why Use Ajax in WordPress
You may think, why use Ajax to call in the YouTube subscribe button? The reason is that it makes your website faster. If someone has already subscribed to your YouTube channel, why load the script every time in the browser and slow it down? You can simply show a cool link that will call the button in without the page reloading. In fact, you can see that I use it on my website here. Also, you will get better speed scores in your Google Page Speed insights, GTMetRix and your Core Web Vital statistics.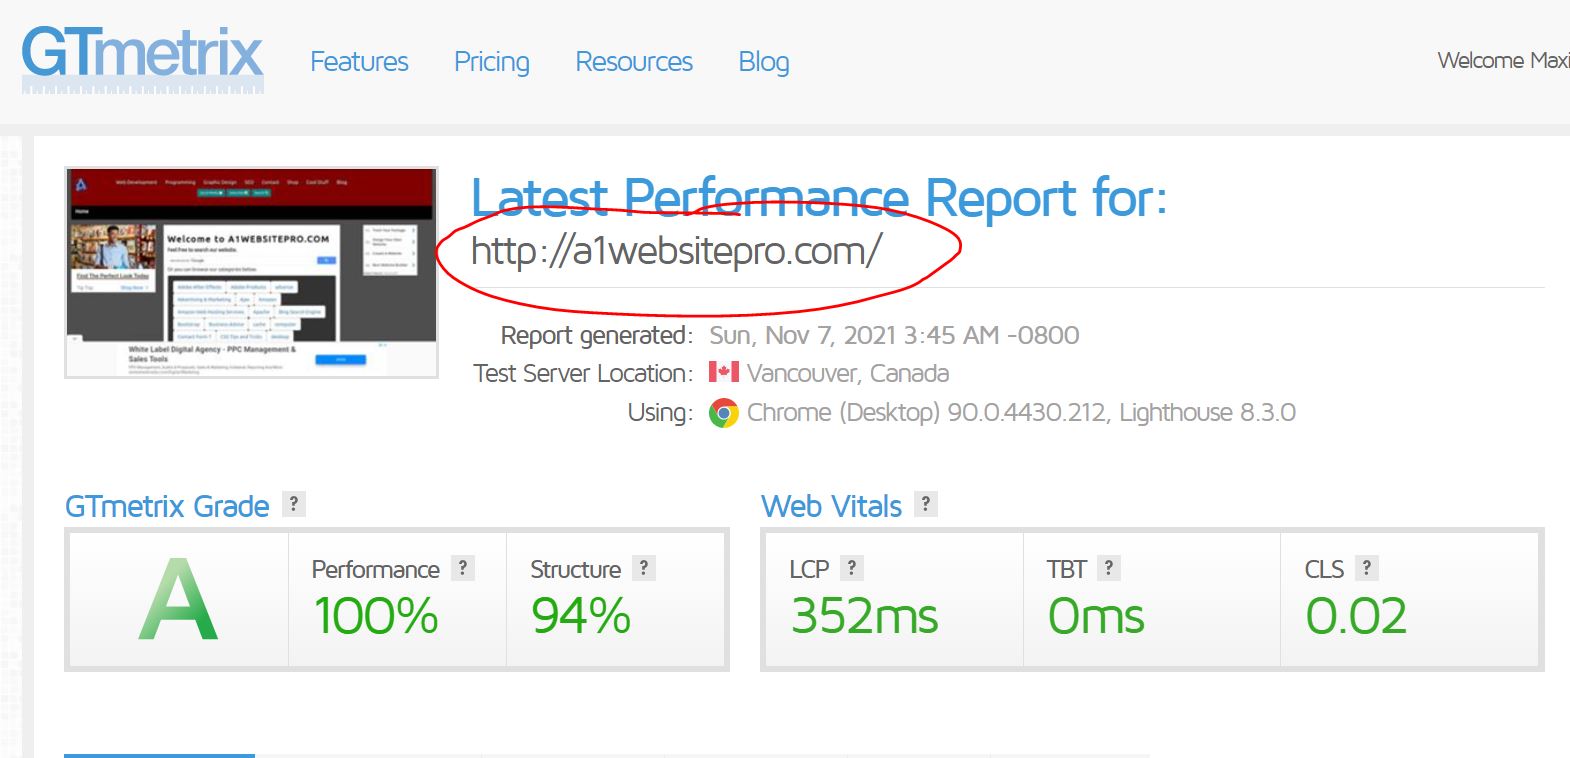 If you are ready to get started, click to the next page and we will create the plugin together. If you just want to download the plugin, then go to the last page. I also have video instructions on the last page as well.
Making The YouTube Ajax Plugin for WordPress
To make the YouTube Ajax Plugin for WordPress create an index.php file and put the following code at the very top of this file. This lets WordPress know that this is a plugin. Remember that we will put this file in a folder in the wp-content/plugins directory. So make sure that you create a directory in there and call it "ajaxyoutubesubscribe". So the directory we will put the 2 files in this tutorial will be wp-content/plugins/ajaxyoutubesubscribe/.<?php /** * Plugin Name: Ajax YouTube Subscribe * Plugin URI: https://a1websitepro.com * Description: Show Youtube Subscribe * Version: 1.0.0 * Author: Maximus McCullough * Author URI: https://a1websitepro.com * License: GPL */
Add Actions and Short Code
Next, we are going to create a short code that our WordPress Ajax is going to use. Put this right below the above code in your index.php file. This function create a short code that contains our YouTube subscribe button. function yt_function() {
return '<div class="well"><script src="https://apis.google.com/js/platform.js"></script>
<div>Subscribe To My YouTube Channel: </div>
<div class="g-ytsubscribe" data-channelid="UCddwvBX5RImtXW9WppZbNMw" data-layout="full" data-theme="dark" data-count="default"></div>
<div></div></div><style>#hideyt{display:none;}</style>';
}
add_shortcode('ytsub', 'yt_function');
Add Action For Loggin and non Logged-in Users
Let's add the following actions for logged-in users and non logged-in users. Notice the "nopriv" in the second action. That means that even if someone does not log into your website, they will still be able to activate the WordPress Ajax by clicking your button. The first action is for logged-in users only. So if you just want to make it for logged-in users, remove the second line. The last part "ytsub_ajax_call" is a function that is being called in to the script.add_action("wp_ajax_ytsub_ajax_call", "ytsub_ajax_call");
add_action("wp_ajax_nopriv_ytsub_ajax_call", "ytsub_ajax_call");
Add Function to the Action
Now we have to enter the function "ytsub_ajax_call" so the action knows what to call. I want to point out something very important here. We are using a nonce. A nonce salt or key will keep your website from repeat attacks. Therefore, in the above WordPress gives you the choice to make your WordPress Ajax available to "nopriv" users or just people who are logged-in to your website. It's for your protection. Since we are making this available to everyone, then we use a "nonce" . Notice as well we added our above short code into the results by storing it in a variable called "$youtubesub". We call it when we get a successful call back from Ajax.function ytsub_ajax_call() {
if ( !wp_verify_nonce( $_REQUEST['nonce'], "ytsub_ajax_call")) {
exit("Goodbye");
}
$youtubesub=do_shortcode('[ytsub]');
if($ajaxs === false) {
$result['type'] = "error";
$result['youtube_subscribe'] = $youtubesub;
}
else {
$result['type'] = "success";
$result['youtube_subscribe'] = $youtubesub;
}
if(!empty($_SERVER['HTTP_X_REQUESTED_WITH']) && strtolower($_SERVER['HTTP_X_REQUESTED_WITH']) == 'xmlhttprequest') {
$result = json_encode($result);
echo $result;
}
else {
header("Location: ".$_SERVER["HTTP_REFERER"]);
}
die();
}
Adding Scripts
We will have to make sure that our plugin has jQuery so we enqueue the scripts. We also have our custom jQuery script we will be adding. This is also where we enqueue the admin-ajax.php script to use.add_action( 'init', 'ytsub_enqueuer' );
function ytsub_enqueuer() {
wp_register_script( "ytajax", plugin_dir_url(__FILE__).'ytajax.js', array('jquery') );
wp_localize_script( 'ytajax', 'myAjax', array( 'ajaxurl' => admin_url( 'admin-ajax.php' )));
wp_enqueue_script( 'jquery' );
wp_enqueue_script( 'ytajax' );
}
Displaying Our WordPress Ajax on The Front End
Now at the end of this index.php file, we will let WordPress know where to display our YouTube subscribe Ajax button. Put this at the very end of your index.php file. This will put your YouTube Ajax subscribe button after the first H1 tag on each post.//Insert link to pull content after first h1 tag.
function lt_before_after($content) {
$beforecontent='<span id="tysub_sub"></span> ';
$nonce = wp_create_nonce("ytsub_ajax_call");
$link = admin_url('admin-ajax.php?action=ytsub_ajax_call&nonce='.$nonce);
$beforecontent .='<p id="hideyt"><a class="ytbe_ajaxs" data-nonce="' . $nonce . '" href="' . $link . '">Subscribe <i class="fa fa-youtube fa-2x" aria-hidden="true"></i></a></p>';
$aftercontent = '';
$fullcontent = $beforecontent .$content.$aftercontent;
return $fullcontent;
}
add_filter('the_content', 'lt_before_after');
?>
That is it for the index file, now we need to include our jQuery script to process the WordPress Ajax request. We will do that on the next page.
The Ajax Script For Plugin
Create a .js file and call it "ytajax.js" and place it in your "ajaxyoutubesubscribe" folder. Put in the following code. This makes the Ajax call and returns the response so that your website does not reload. jQuery starts with the document ready function to make sure your webpage is loaded then it waits for someone to "Click" on your button. If they do, then it begins calling in your YouTube subscribe button. This script does not get loaded until someone clicks on your button thereby increasing your speed and scores on your website. Not to mention, giving you a really cool feature for your website visitors.jQuery(document).ready( function() {
jQuery(".ytbe_ajaxs").click( function(e) {
e.preventDefault();
post_id = jQuery(this).attr("data-post_id");
nonce = jQuery(this).attr("data-nonce");
jQuery.ajax({
type : "post",
dataType : "json",
url : myAjax.ajaxurl,
data : {action: "ytsub_ajax_call", nonce: nonce},
success: function(response) {
if(response.type == "success") {
jQuery("#tysub_sub").html(response.youtube_subscribe);
}
else {
alert("Could not get form.");
}
}
});
});
});