ADDING MEDIA AND FILES
The reason why we covered the Google Keyword Planner first in this class is so that you would know what to name your media files. When planning an article, product or description sometimes it's helpful to write the outline first. This will give you relevant data. Here is a list of media files that you should use your keyword phrase and variations of that keyword phrase in.
-
Pictures
-
PDF file
-
Flash File
-
Video Files
ALT and Title tags
By using your keyword phrase to name your media files you are targeting subject matter. When those files are uploaded they create URL's to those specific files! This is very important to remember. You will notice in the graphic below I was targeting the keyword phrase "How to take a good picture" and even though it has a stop word I have a page rank of 4 so I am hopeful that by using different variations or combinations that I will get indexed in the image search of Google where I want these pictures to show up. If you look closely you will see the image URL to that picture, notice it has a variation of my keyword phrase. Later on I can write another article on pictures and target the new keyword phrase that we come up with above and link back to this article and give it some "Link Juice". I also have the option of writing that article on one of my other blogs and linking back to it giving it some more "Link Juice". In order to get media indexed by the use of a URL you should have a file name that describes the image. You should use your keyword phrase or a variation of it.
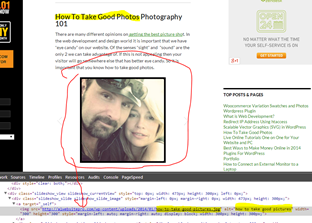
The best way to get your images indexed in the search engines is by taking advantage of the "Title tag" and "ALT tag". The ALT stands for alternate. Originally browsers that could not show a certain media type used this to display words instead of the graphic. It evolved into something that the spiders used to index media. Now in order to get indexed well for your media you can take advantage of this. Remember that users on the internet are not just searching for articles they are searching for pictures too. Eye candy is one of the best things that you should concentrate on when it comes to your website. People love to look at pictures, Title and alt tags are in the image tag, here is an example of an image tag.
<img src="
#ffff00;">http://a1websitepro.com/uploads/2014/01/how-to-take-good-pictures.jpg"
#008000;">title="tutorial to take a good picture"
#0000ff;">alt="how to take good pictures" width="530" height="530" />
In the yellow we have the URL to the image notice it has out keyword phrase within it. Next we have a title tag that also has a variation of the keyword phrase. Next we have the alt tag in blue that also describes what the picture is about and its subject matter. Then finally we have the size of the image width and height. This entire image tag is an embed tag within a webpage to display an image. When the search engine spider comes down and scans the page it reads all this information and indexes accordingly.
Watermarking
Watermarking is a method that deters piracy on the high seas of the internet. It is also a way to market yourself or promote your "brand". I think it is wise for everyone to take advantage of this even though I have not done it so much myself. There are several different scripts out there that will let you "Watermark on the fly". That means as you upload your pictures to your website they will automatically be watermarked. In the WordPress CMS there is a great plugin to make this happen. For those that do not have the advantage of a CMS there is a standalone application at A1WebsitePro.com that will help with watermarking. Below I will give instructions on installing this to your WordPress CMS.
- Navigate to the plugins on your dashboard.
- Click "Add new"
- Type in "Image watermark"
- Look for the one by dFactory and install and activate it.
- Go down through your options. You can upload an image with a transparent background for your watermark or you can use text.
Branding
Branding can be a very effective means for product familiarity or identification. This can be done by creating a logo that is original but simple. Here are some tips for creating a great logo for your business.
-
Research your audience.
- Creating a logo design isn't just about creating a pretty visual. What you're doing, or taking part in, is developing a brand and communicating a position. It makes sense, then, that the first step in creating a logo design should be to research these concepts.
- Make a lot of sketches be original and simple.
- Search "Google Images" for logo for inspiration
- Resist the urge to imitate someone else exactly.
- Avoid fonts that are gimmicky
-
Use blank space effectively.

- Keep it clean and experiment a lot
You can then use this logo as a brand for you watermarks as well. Don't worry about getting this done before you upload photos. Take your time, you can bulk watermark and brand photos all at once with the plugin that I had you install.
USING BING KEYWORD RESEARCH FEATURE
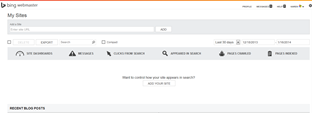
In order to use the Bing keyword research you have to have a Microsoft account and then you have to add your site. Creating a Microsoft account is easy. Just fill out the information and enter your current email address. Next you will get a screen that looks like below. Type in the name of your website and click "add".
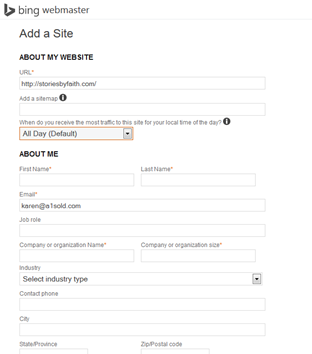
Next fill in the site information that they are requesting.
When you get to the part where it asks for a site map follow these steps.
- Go to your dashboard.
- Scroll down to where it says SEO
- Click on XML sitemaps
-
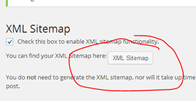
Tic the box where it says enable this functionality
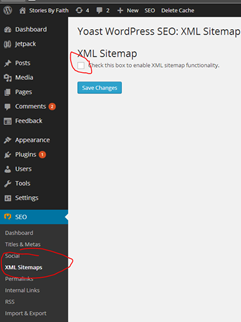
- There will be a drop down appear and you want to pick Yahoo and Ask when something new is published.
- Finally click "Save Changes"
-
You will see a button that links to the XML sitemap, click it.
-
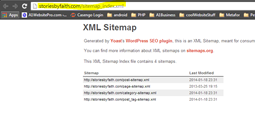
Now grab the URL and enter it into the information for Bing.
-
When you get to the bottom make sure that you tick all the error reporting boxes.

- Now you will have to verify that you own the site so the next screen in Bing will give you something like this. Copy the Meta tag to your clip board and go back to your dashboard in WordPress.
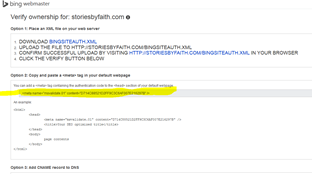
- Scroll down to the SEO plug in and hit "Dashboard"
-
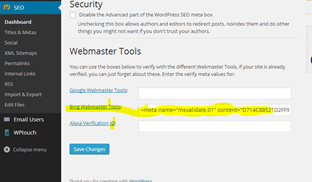
Under the "Webmaster Tools" section paste in the Meta code and click "save changes".
-
Now go back to your Bing account and click "verify"
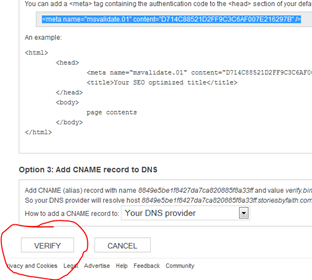
- Now you should be verified, if not go back and repeat the steps.
-
You should see a screen like this.

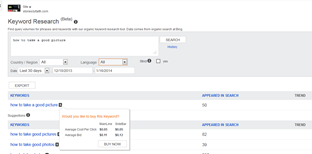
- Now you are ready for Bing Keyword research in order to see the competition in Bing.
The Bing keyword research tools are a lot simpler than the Google Keyword Planner and the metrics are a little more limited as well. You have to hover over the $ sign to see the competition. It will let you know how many times in the past 30 days that keyword was search for. I recommend concentrating on the Google Keyword Planner first and then experiment with the Bing Keyword research Tool" when you become effective at picking keywords. You can then learn to use them in unison to get the best SERP experience.
 The best way to get your images indexed in the search engines is by taking advantage of the "Title tag" and "ALT tag". The ALT stands for alternate. Originally browsers that could not show a certain media type used this to display words instead of the graphic. It evolved into something that the spiders used to index media. Now in order to get indexed well for your media you can take advantage of this. Remember that users on the internet are not just searching for articles they are searching for pictures too. Eye candy is one of the best things that you should concentrate on when it comes to your website. People love to look at pictures, Title and alt tags are in the image tag, here is an example of an image tag.
<img src="#ffff00;">http://a1websitepro.com/uploads/2014/01/how-to-take-good-pictures.jpg" #008000;">title="tutorial to take a good picture"
#0000ff;">alt="how to take good pictures" width="530" height="530" />
In the yellow we have the URL to the image notice it has out keyword phrase within it. Next we have a title tag that also has a variation of the keyword phrase. Next we have the alt tag in blue that also describes what the picture is about and its subject matter. Then finally we have the size of the image width and height. This entire image tag is an embed tag within a webpage to display an image. When the search engine spider comes down and scans the page it reads all this information and indexes accordingly.
 Next fill in the site information that they are requesting.
 When you get to the part where it asks for a site map follow these steps.


