What is the ShellShock Bug?
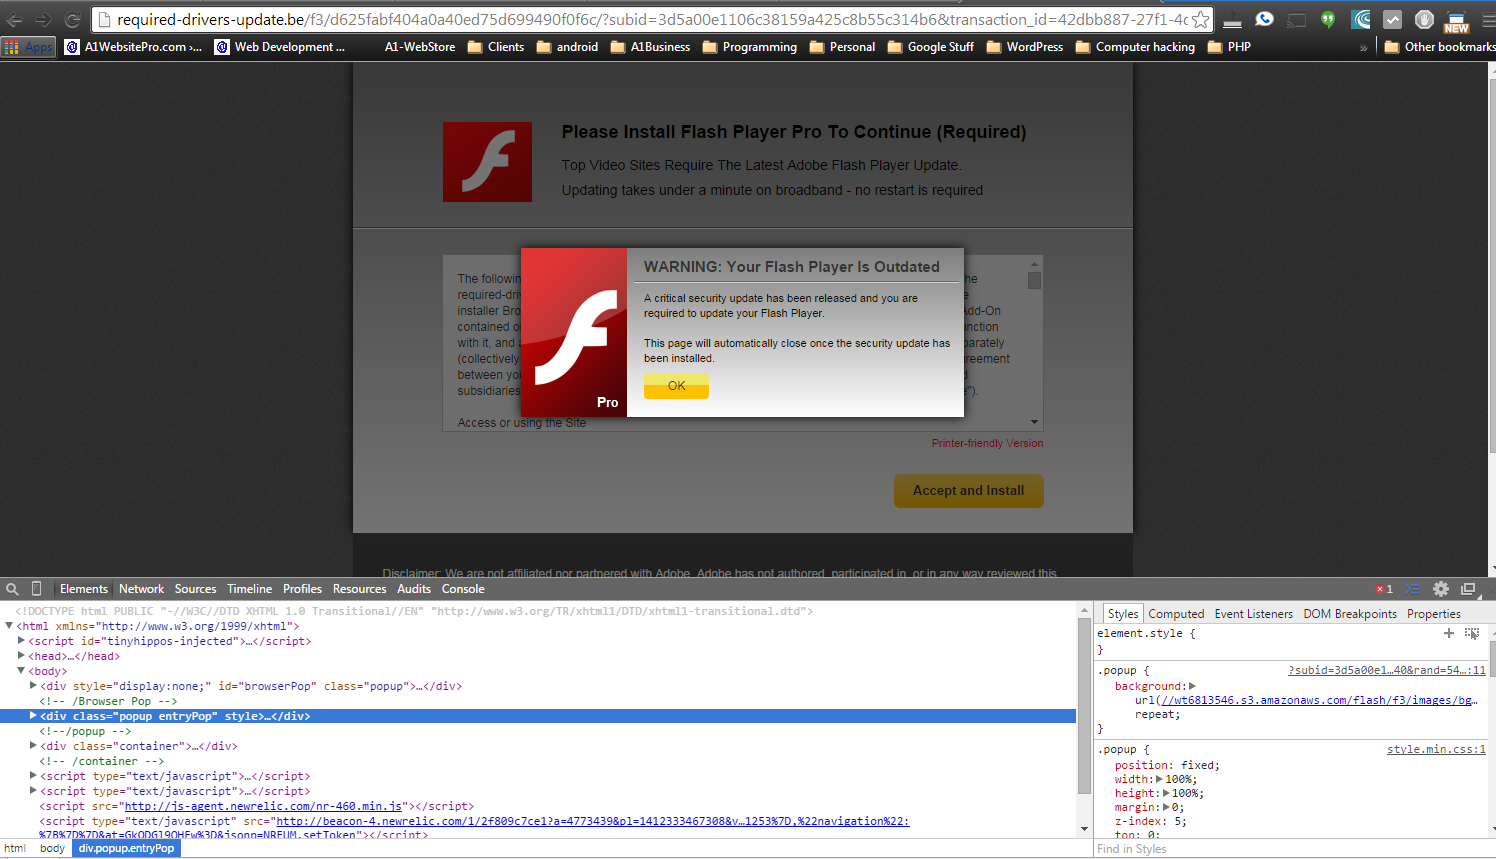
Shellshock is a security vulnerability on your Dedicated or VPS server. It is a way for the bad guys to get in and manipulate things on your server and take away your fame and fortune! What is standing in their way? Me, because I am going to show you how to protect yourself and your fame and fortune. Showing you how to Update Dedicated Server for ShellShock is a little tricky. For those customers of mine who are on my servers this process has already been done. Sleep well little children! lol. For the rest of you, I would like to win your confidence by showing you how to do this for yourself. There are a few steps but as long as you follow this tutorial step by step you should be good. Remember to have someone else do this for you could cost thousands of dollars so please share this article and together we can help stop the bad guys. One of the things that shell shock may be responsible for on dedicated servers is the flash update adware. you go to a website and you see this pop up covering your entire screen. The other alternative is that you have a bad ad spot.
Download Putty.exe
The first thing that you are going to have to do is download putty.exe. You are going to see a lot of download on that page just make sure that you download "putty.exe". The other downloads are going to confuse you if this is the first time going through this process.Laying the groundwork for Putty
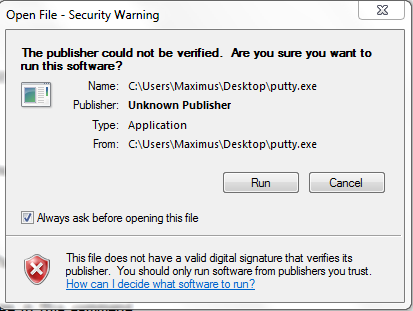
After you downloaded putty double click the putty icon. You are going to come to a screen that looks like this. Click "Run".
 Now you will see a screen that looks like this.
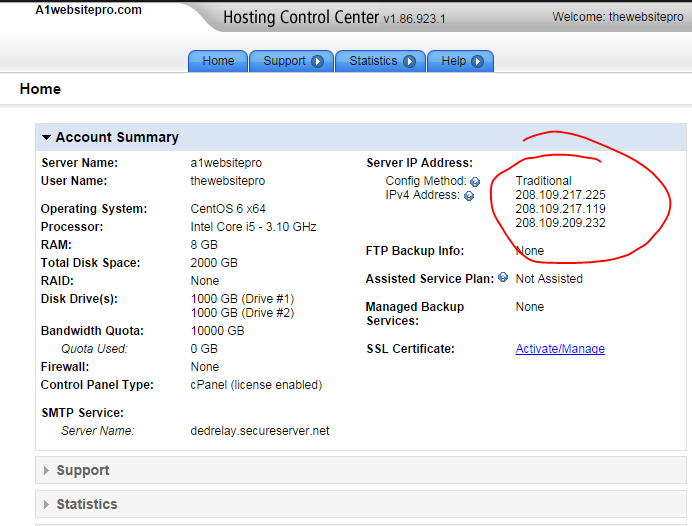
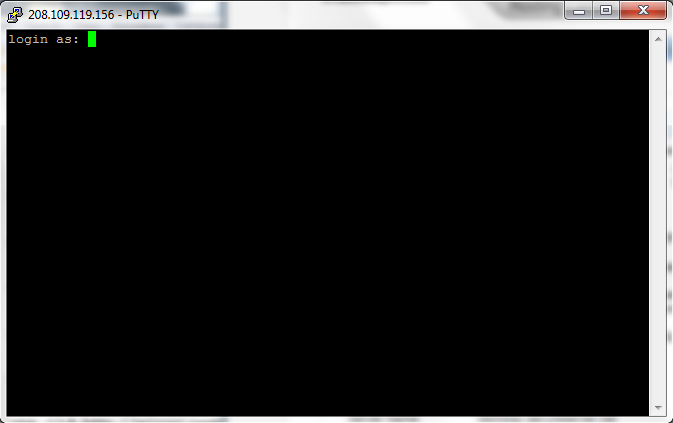
 Enter your ip address for your server. If you want to get the ip address for your server then go here and enter your website name. To be sure it is the right one you can get it from your hosting control panel as well. You want to look for "Server Ip Address".
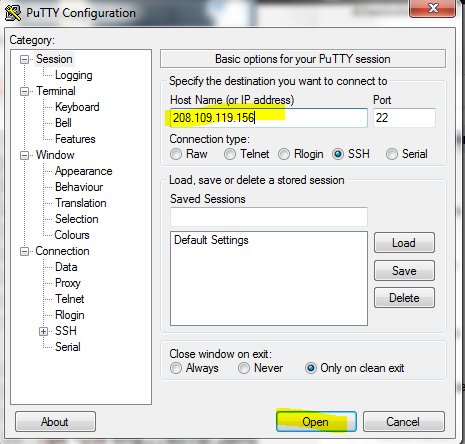
 Enter your ip address in the box provided and then click "open".
 Next you may see a putty screen that looks like this. Click "Run"!
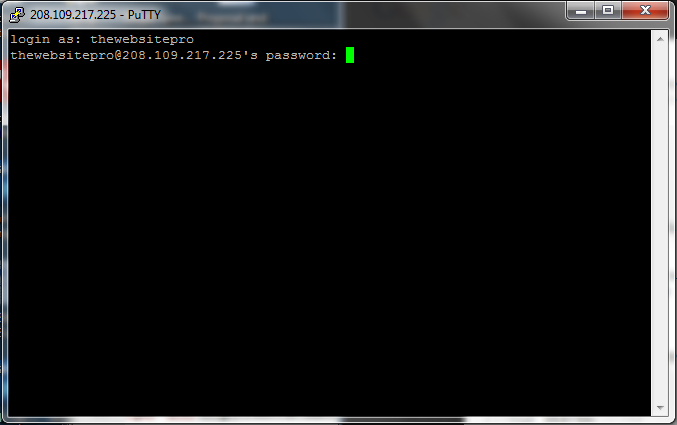
 Now you will see a screen like this. Enter the username for your server. If you don't have it contact your hosting provider.
 Next you will have to enter the password for your server. You will not see the password as you type it in. It is a part of putty security so make sure that you type it in right the first time. There is a little trick that I show you on the video on how to enter information into the putty program by copy and paste. Basically you copy your code like normal but when you hover over putty and right click it automatically puts the command line in. Again see video for this little trick.
 Now you want to access the "Root" of your server. If you have ever dealt with an MSDOS program this might be familiar to you. That is where the rest of the instructions come in below. All your command lines are there for your convenience. Make sure that you determine what kind of Operating system you have before you
Determine what Kind of OS you have
Determine what kind of server that you have. You can do this by logging into your hosting providers website and look at the details about your server. Here is what they look like at a1websitepro.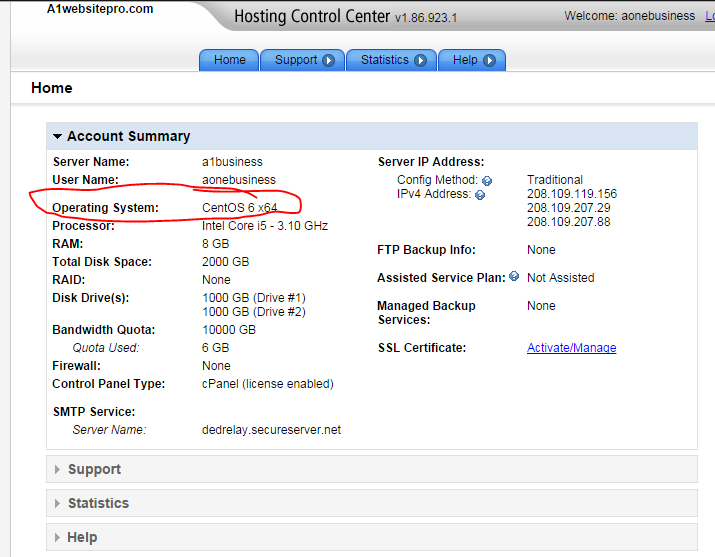 The choices could be one of the following. Remember you will only follow one set of instructions below this line. :-)
- CentOS & Hosting Control Panel
- CentOS & Gateway
- Ubuntu & Hosting Control Panel
- Ubuntu & Gateway
- Fedora/Red Hat & Hosting Control Panel
- Fedora/Red Hat & Gateway
CentOS & Hosting Control Panel
{This will log you into the root of your server}su - rootThe following command will tell you whether you are using a 32 bit or 64 bit system on Cent OS. Depending on what your inquiry is will determine what command line that you put in!
uname -mYou will have to enter su - root AGAIN to get to the root of your server before proceeding with the following steps!!!
CentOS 5 32bit
rpm -Uvh http://mirror.centos.org/centos/5/updates/i386/RPMS/bash-3.2-33.el5_11.4.i386.rpm
CentOS 5 64bit
rpm -Uvh http://mirror.centos.org/centos/5/updates/x86_64/RPMS/bash-3.2-33.el5_11.4.x86_64.rpm
CentOS 6 32bit
rpm -Uvh http://mirror.centos.org/centos/6/updates/i386/Packages/bash-4.1.2-15.el6_5.2.i686.rpm
CentOS 6 64bit
rpm -Uvh http://mirror.centos.org/centos/6/updates/x86_64/Packages/bash-4.1.2-15.el6_5.2.x86_64.rpmNext you want to test to make sure the install was successful. Type in this command
cd /tmp; rm -f /tmp/echo; env 'x=() { (a)=>\' bash -c "echo date"; cat /tmp/echo
If you have done it correctly you will see these 2 lines
date
cat: /tmp/echo: No such file or directory
CentOS & Gateway
Enter this command line and your done! :-)yum -y update bash
Ubuntu & Hosting Control Panel
Ubuntu 10.04 32bit
curl -O http://security.ubuntu.com/ubuntu/pool/main/b/bash/bash_4.1-2ubuntu3.4_i386.deb && dpkg -i bash_4.1-2ubuntu3.4_i386.deb
Ubuntu 10.04 64bit
curl -O http://security.ubuntu.com/ubuntu/pool/main/b/bash/bash_4.1-2ubuntu3.4_amd64.deb && dpkg -i bash_4.1-2ubuntu3.4_amd64.debNow you can test your server by running the following command.
cd /tmp; rm -f /tmp/echo; env 'x=() { (a)=>\' bash -c "echo date"; cat /tmp/echo
If it is configured properly you should get this reading.
date cat: /tmp/echo: No such file or directory
Ubuntu & Gateway
Run the following command line.sudo apt-get update && sudo apt-get install --only-upgrade bash
Fedora/Red Hat & Hosting Control Panel
Run the following command lines based upon your system.Fedora 19 32bit
yum install https://kojipkgs.fedoraproject.org//packages/bash/4.2.48/2.fc19/i686/bash-4.2.48-2.fc19.i686.rpm
Fedora 19 64bit
yum install https://kojipkgs.fedoraproject.org//packages/bash/4.2.48/2.fc19/x86_64/bash-4.2.48-2.fc19.x86_64.rpmNow you can test to make sure that it is done properly by running this command.
cd /tmp; rm -f /tmp/echo; env 'x=() { (a)=>\' bash -c "echo date"; cat /tmp/echo
It should put out this response line.
date cat: /tmp/echo: No such file or directory
Fedora/Red Hat & Gateway
Run this command lineyum -y update bash