TablePress for WordPress Intro
Ok now finally you understand how a table works we can move on to WordPress plugin Table Press. If you did not read the above section you may want to do that so you don’t get lost. Here we go!
- If you have not installed it yet install the TablePress WordPress plugin. Make sure that you activate it after the install.
- Create a table by navigating down on your dashboard to TablePress and click “Add New Table”

- Give it a name and a description
- Pick the number of Rows and Columns that you want. The example above was 3 rows 3 columns.
- Click “Add table”
- Now you will see your blocks appear, click inside the block you want to enter content into.
- Now you can either start writing text or you can choose to insert media from your medial library. You will have to click in the box again after you click one of the buttons circles in red.
- If you just want to enter text with an image and links choose the advanced editor option. You will probably use this one the most.

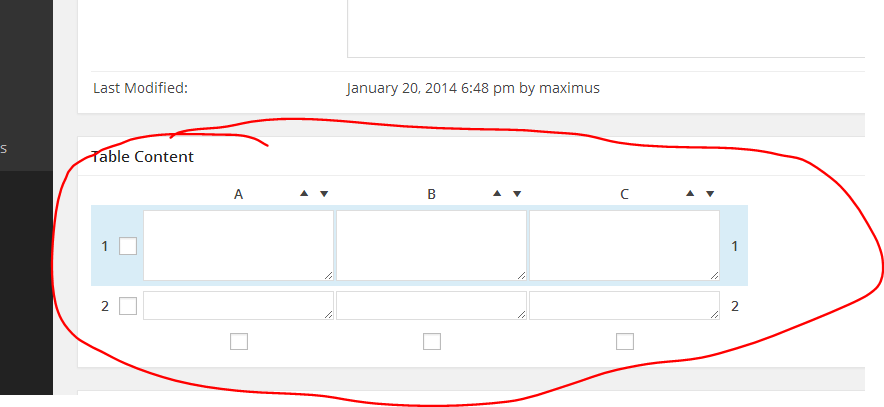
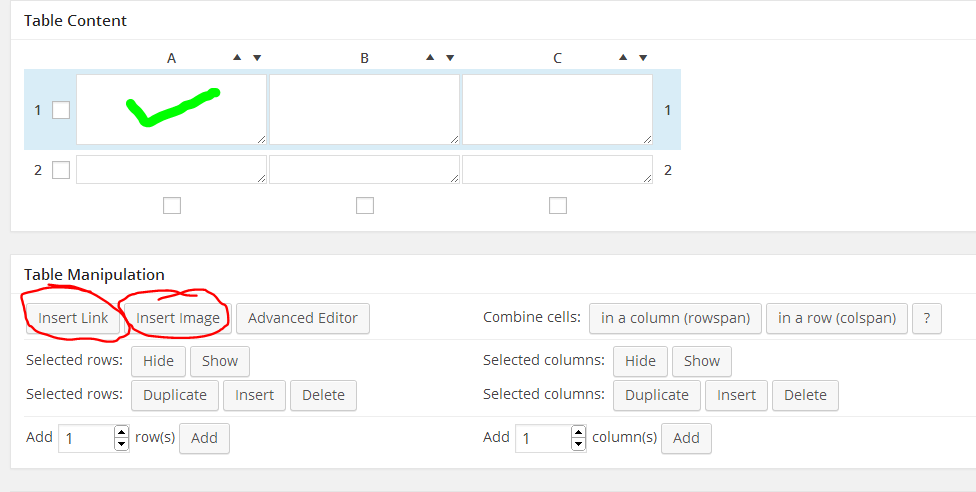
Table Manipulation
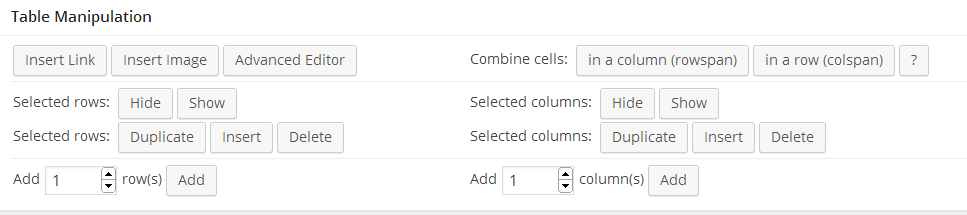
- As we go down on the page in table manipulation we can see that we can hide or show a table. This would come in handy if we have a table that is live on the site and are currently editing it. It would also be useful if we are writing about time sensitive information.
- We can also duplicate the row we are on or insert a new one or delete a row all together.
- In the bottom part of the table manipulation we can add multiple rows.
- If we move over to the right hand side of table manipulation this has to do with the “columns” Remember the column above where I had one big row across the top and three underneath of it? Well that is where you would take care of something like this in “Combine Cells”
- Once again as with the rows you can show or hide columns to the users on the front end.
- You can also duplicate, insert of delete columns.
- Finally you can add multiple columns.
Table Options
If we wanted to treat this table like it had a footer and a header we would tick the options available. This is also good if you plan on using your own CSS to style these elements. Watch the video for complete instructions. This is a detailed procedure with several steps. Here you can also choose to alternate the background color of rows. You can choose whether to highlight when the mouse hovers over a row. You can even choose whether to show your title and descriptions above and below the table. The important thin here is that you can edit the CSS for this table in the link “Custom CSS”
Features of the Data Tables JavaScript Library
Here are some nice features, let me number them
- You can enable or disable the following features by ticking or unticking the first box.
- You can enable sorting for your visitors so they can manipulate the tables themselves.
- You can enable pagination which is also nice if you have a lot of content. They can page though your tables like a book. You can even choose how many default rows they will see when they first get to the page.
- Another feature with the pagination is if you have a lot of content in the tables. Lets say that you had 100 rows but wanted to give your visitor control over how much content they see. You can do it here. They will see a drop-down box where they can choose how many rows to see at one time.
- You can let your visitor know how many rows there are in the table they are viewing by clicking this option.
- You can enable horizontal scrolling as well.
WordPress plugin Table Press styling the CSS VIDEO TUTORIAL
Easy
Advanced
More Advanced ColSpan and RowSpan
11 Comments
I have very little experience about tablepress. Just use it in one of my client’s project. It’s very Handy.
Hi Brad, Yes I have used it several times. Its great for those hard layouts in WordPress. Thanks for the comment!
Hi Maximus, thanks for posting the blog & video tutorials, they’ve been very helpful! Question regarding where to place the CSS code: on your video, you pasted the CSS code on your WP’s Twenty Twelve stylesheet & not under TablePress ‘ Plugin Options tab in the Custom CSS field. How did you go about identifying the Twenty Twelve stylesheet is the correct place to paste the code & why isn’t the Custom CSS field used instead?
Sure thing, glad I could help! 🙂
Hi,
I am new on wordpress and css, but I would like to know how the table can just take the style from my style.css? First the table header, I couldn’t make it work as I wanted,I add this to my newtable class on Plugin options
(Also I added the newtable name on the table extra css classes):
.newtable .row-1 {
font: normal normal bold .85em/25px Arial, “Helvetica Neue”, Helvetica, sans-serif;
padding: 4px 2%;
text-align: left;
border-top: 1px solid #f4f2e7;
border-bottom: 1px solid #f4f2e7;
border-right: 1px solid #f4f2e7;
font-size: .9em;
color: #f3f0e0;
background: #635a52
}
and the font color never appeared right.
Then I would like a border between all the columns and I tried adding the following but the table just didn’t take it:
.newtable {
margin: 0 0 25px 0;
width: 100%;
background: #f4f2e7;
border-left: 1px solid #f4f2e7;
border-right: 1px solid #f4f2e7;
}
I appreciate any help, I am using the My Life theme…
Thanks a lot!
I changed the borders color and no luck…
What is the name of your url where you are editing the table?
Thanks for your advice, I am installing the custom css and try.
I was updating directly on the style.css and didn’t work, so I wrote the code directly on the plugin options, on the custom css section.
To be able to see cell borders I added something I don’t like too much, but worked. In my page I found the column-1 class (added by the table press plugin), and then I added the following on the custom css:
.newtable .column-1,
.newtable .column-2,
.newtable .column-3,
.newtable .column-4,
.newtable .column-5,
.newtable .column-6,
.newtable .column-7 {
border-top: 1px solid #f4f2e7;
border-bottom: 1px solid #f4f2e7;
border-right: 1px solid #f4f2e7;
}
Hi Liz, install a plugin called custom css and enter the code there. This way if your theme ever has any updates you will not over ride your changes. Also the custom css plugin will be executed first so it will over ride any css that you have in the theme. I hope this helps. 🙂
great tutorial max! I have a question, is it possible to style the ColumnFilterWidgets for tablepress?
I believe so. Just target it like you would anything else. Give it an ID or a class then start styling. 🙂