When you create a file in GIMP the first time you will see that you have several options to consider. GIMP was actually designed to be image manipulation software, however you can paint with it as well. GIMP has several different paint brushes and patterns to use that come installed with the software.
The following tutorial will assume that you have already downloaded and installed the GIMP software. You may want to read our GIMP review to make sure that it is going to suit your needs before using the program.
Creating A File in GIMP The First Time
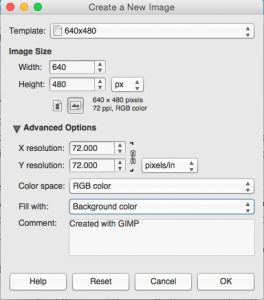
When creating a new file in GIMP you will see template settings. All of them have a setting of 72 DPI that can be changed under the advanced options.
When you create a file in GIMP for the first time by clicking “file” then “new”, there will be limits to set. GIMP comes with several templates so you can get a quick start to your project. However every one of the template settings are set to 72 DPI. You can see this if you open the advanced options. 72 DPI is the standard setting for monitors. Your computer monitor show’s 72 DPI so setting it any higher would not be necessary unless you are going to zoom in on your photo. You will notice that if you create a graphic that is 72 DPI and make it 5 inches by 5 inches and zoom in to the photo it will become pixellated. Why does it do this? Because there are only 72 DPI set to that graphic.
If you are sure about the size of the area that you are making the graphic for then you can leave this set to 72 DPI. However if you are going to give the capability to your users to enlarge the picture to get a closer look you may want to start with 200 or ever 300 DPI. Take a look at the 2 graphics below. One is 72 DPI and the other is 300 DPI. Because they are both set at 640X480 Pixels the 300 DPI is taking more CPU and Bandwidth to display than it needs to.
72dpi in gimp
300dpi in GIMP
They are both 640X480 but if you zoom in on the 72 DPI it will lose quality or start pixelating before the 300 DPI because there are more dots of color within a square inch.

72 DPI Loses quality when blown up before the 300 DPI

300 DPI retains more quality because it has more dots of color per square inch
Get the Specifications Before Starting Image Creating in GIMP
Although the 300 DPI looks better when it is zoomed in, it may not be necessary to have such a large file. The best thing to do is plan before you start creating the images. Think about where the image is going to be placed before you create it. Many high-definition magazines want 600 DPI for their printers. That is because the sizes may also be used in larger application like billboards on the side of highways, or large screens in downtown New York City. However when you are creating a graphic for your website get the square inches of the placement first and then start designing the graphic.
GIMP File Types
The above tutorial is for file types with exact dimensions. These would be PNG, JPEG, GIF and Bitmap files. However if you are going to be taking advantage of GIMP’s SVG files then the DPI is not that important. SVG is a scalable vector graphic file format that can be blown up very large without losing any quality at all. All the lines stay crisp. SVG and CSS are similar in the sense that they do not lose quality while being enlarged. There will be more tutorials on this later.
Things to Consider When Creating a File For The First Time in GIMP
- The width and height of where the image will be placed.
- Will the image have the capability of being zoomed in.
- The file format of the image.
With these three pieces of information you can create a great graphic for whatever space you are trying to fill with it. Utilizing your space efficiently online should be your goal. However when creating graphics for printers then you will have to see what the parameters are before starting.
A1WEBSITEPRO Social Media Pages
Here are my social media pages, lets hook up!